Did a tutorial series for the AREA this is part 1 or parte uno if you're Spanish!
http://area.autodesk.com/tutorials/fx_shot_process_with_david_schoneveld_part_1
Scriptin' Update
So what's been going on? Well hey thanks for asking! I've got the main classes put together and plugged in with some of my content. I'm mainly working on the PollockPawn, PlayerController, GameType classes. I also have AIController, EnemyPawn, and I think another but I'm forgetting as I write this. Anyway. I also have a LOT of work to get the enemies ready even to put into Unreal. They need to be re-UV'ed and Textured, bound (they're rigged) and animated. Joy, so there's that. But as Far as PollockPawn goes I think he's just about ready. I mean its more flipping a few switches than it is writing any code. Yet, despite the simplicity of some of it, I'm still moving forward slowly. I'm trying to read through some classes, and re-read them again trying to get a sense of things and where things will be when I need them later. There's so much a LOT of sound controls, which I'll have to come back to. Anyway, its not working in game yet, actually I don't know exactly what it will look like when it is working in game. I've found that most tutorials that use Unreal Script don't really know what they're doing (I've seen a lot). If anyone knows of a really good one, I'm all ears. So I'm paving my way forward, steady and slowly.
Current PC Build Recommendation
My friend was building a computer so we went through a bunch of components to figure out what he should make. Here is the current list of what I think makes a great mid priced PC ($1600ish). Its not far from my current PC newer CPU, GPU and more power.
CPU: Intel Core i7-2700K Sandy Bridge 3.5GHz (3.9GHz Turbo)
Motherboard: ASUS P8Z68-V
Memory: CORSAIR Vengeance 16GB
Graphics: EVGA GeForce GTX 570 HD
OS/Software Drive: Intel 510 Series 120GB SATA III
Data drives (buy 1 or 2): Western Digital Caviar Black 1TB
Power Supply: PC Power and Cooling Silencer 910W
DVD/blue ray cheapest one, whatever you need drive
Case... its kinda up to you on how you want it to look. This is the case I have, cheap and works fine.
Antec Three Hundred Black Steel ATX Mid Tower
Unreal Scriptin'
Well not really. I started doing a tutorial for bot AI and I felt like I needed a bigger refresher on Unreal Script so I started watching the Eat3D Unreal Script videos again. I feel like I missed a lot the first time and am getting a lot more information this time than I thought I would. its good. I also made a playlist of SMU's Unreal Script youtube video's here. There are more tutorial videos these are just the ones I want to watch or re-watch, as I've seen a few already. Anyway going well, I'm going to push forward on the tutorials even if I don't know everything I'm doing, just to keep momentum.
Dragging my feet
Well right now I'm sorta dragging my feet b/c I know I need to write my own game classes and start really making this game. I got a bot working in my test enemy level, but its AI is Deathmatch so if I want more than one, they will kill each other. Sure I could spend time to get that to work, but the point is I need to do it right away. By right I mean make my own game type, and pawns. Its not hard, I just have to do it, and that means fixing my visual studio, getting back on the horse of Unreal Scripting. I even know what I need to write, and I can see lots of problems I will already have before my game is workable again. However when it is, it will be all but ready to level design it out and play, but more importantly I'll be making a game "right" and be better for it.
TO DO's:
TO DO's:
• Get Visual Studio to "see" all the other class files in the src folder.
• Write my own game type.
• Edit PollockPawn to be a working class file.
• Write GuardPawn, SoldierPawn, EenemyPawn classes.
• Make a death/respawn scenario & end game conditions.
• HUD UI, working health and weapon ammo meter.
• Might as well make the controllers in code if I'm going this far.
A.I. Bot Trouble
Well I knew it wouldn't be easy, but it seems that all the tutorials 'n such online say basically the same thing and none of that works anymore in the current UDK. I've tried a bunch of different variations but so far, nothing fully working. I got an invisible guy to die and drop an item but that's not really useful.
Meanwhile I'm getting back into studying architecture and design theory to help in making more interesting levels. Got a few books I've started reading, 1 is the updated version of a great textbook from Architecture School in collage.
Meanwhile I'm getting back into studying architecture and design theory to help in making more interesting levels. Got a few books I've started reading, 1 is the updated version of a great textbook from Architecture School in collage.
All Fixes Check
Fixed and updated my list last night. New Mesh & Texture, fixed collision/blocking models, testest vertex colors, and colored lights both working.
Now enemies/bots/AI.
Now enemies/bots/AI.
Big Inspirations
Mini Gore, design, color, tone... so awesome. Really inspires me, and I think it will show in Pollock. I can't help but love it for so many design reasons.
 Team Fortress 2, color pallet, game play mechanics, balance, style, top knotch work that holds up years after it's made. Still one of my favorite games, if not the most.
 Both have excellent character design, combined with such a wonderful sense of color. Both are things I will continue to work on.
New Monitor on the Way!
Ok lame update. I have a 21" wide-screen Dell UltraSharpe. Picture/quality has been great for years. Still great, so much so that I never felt it was really worth it to upgrade. So I always work on a smallish screen. Welp today's different. UDK is hard to work with only 1 screen. With all the window optimizing, and customizing in Maya I got along pretty well. UDK doesn't have nearly the same, so you're always closing, minimizing and looking for windows.
My second monitor, will be my new first, a 24" Dell UltraSharp U2412M that I got with a techbargins cupon code for $319 ($354 shipped) I'm happy. I dreamt about a 27" or 30" but still way too expensive. 24" is the perfect compromise for me for size/screen quality/price.
Eat3D iOS Mobile Game Production DVD Review
Sjoerd "Hourences" De Jong knocks it out with this one. I'd say Eat3D's iOS Mobile Game Production DVD is the best DVD so far for UDK, altho not for beginners. If you've gotten a good foundation in UDK then this is well worth the money. Every video has something or lots of things to add to or build on your pre-existing knowledge.
I'm going so far as to give it 5 stars! It was 4-4.5 until the last 2 where he goes over The Ball iOS conversion, such great valuable information I highly recommend this DVD.
I'd love to see him (or whoever does it for/with him) do Enemy/Bots/AI the only thing "missing" from this series. I say "missing" in quote b/c its not really missing just something else I'd love to see a series on.
Fixes 'n Tweaks
Fixed the anim tree last night, so the tail now moves with him in a semi-dynamic looking way, or based on direction. Added blocking volumes, and removed the wall paneling that I felt wasn't worth the modeling. I'll do something better but for now I have just flat walls.
Tonight, updating Skeletal Mesh with new model/texture that was the second paint over.
Tonight, updating Skeletal Mesh with new model/texture that was the second paint over.
GamePlay 10/17/11 Update
Getting things together, was mainly focusing on the visual quality. Still a ton of things to do of course. Next up is getting Pollock character update to the new mesh and texture. Get his anim tree back to the point it was before where there was better tail reaction. Along with all the level tweaks to get it up to par.
...then Bots and AI.
Re-Paint Take 2
So why care about re-painting the character now? Why not just keep pushing forward and making game plan 'n such? Good questions, well I've gotten to a new point where I'm happy and am pushing forward on the game. I wanted to get closer with the main character b/c his style will set the tone and look of the world he lives in. While I have some more ideas and things I want to do this is good for now. My friends (mostly Sergio Santos) at work gave me some good notes, and helped shape the direction.

I've been also reading up on what it takes to make enemies, after I get this level and textures into Unreal and all things back playing (this weekend) Enemies are the next up.

I've been also reading up on what it takes to make enemies, after I get this level and textures into Unreal and all things back playing (this weekend) Enemies are the next up.
Pollock Re-Paint
Been working on colors and baking AO + GI but so far that's not looking good, here's the current re-paint
 I wanted to get that dark patch working on the nose, which was harder than it may look here. Its getting there but not "there" yet. I'm going to move on to other things, you know, its a process.

Side Note: Early Inspiration
After going to IndieCade this weekend, I was reminded of the first games I played on my dads Atari, it was a desktop computer, something along the lines of this:


can't say for sure since I was 5 years old at the time, but you get the idea. Anyway the 2 games I remember playing was (after searching and finding either the closest thing in my memory or actually the game) "Rogue" or "Roguelike" or "Super Roguelike" hah, I remember it looking like this but being black and white so... who knows but it looked like this

The other game was "Battlezone" or something like it but looked a heck of a lot like this either way, but I also remember that being black and white.
Could it be that our computer was black and white monitor? could be, I don't care to research it to that depth, but I wanted to share my earliest game experiences, that still are genres that I love, FPS and Dungeon Crawlers/hack 'n slash, altho I don't get in the mood for hack 'n slash very often, it needs to be more RPG than just simple hack 'n slash.
Modular Level Constructed

Clouds Tutorial
OMG A new post! Wow, yeah I figured it was about time to make a new tutorial. Clouds, something an FX artist gets asked to do many many times over the course of his/her career. While I have a bag of tricks for whatever the shot needs, this is by far my most trusted, in that it gets results fast and looks decent. Its got limitations but overall I find I can get most of the shots done with a combination of these techniques. The secret, I use maya presets! LOL just watch it.
And as a bonus, I did even an extra trick video. This ones a great technique that I'm still excited about even tho I've known and used it for a while now.
another written update
what no pictures?!?! WTF? I know, well I've been doing things that are not picture or video worthy yet.
This weekend I got exploding objects. Object that can be destroyed, switch mesh, emit particles. Showed me that my gun is working which is good.
I've been working on my level kit so I can make a real level. I think the objects are almost all made. I'm now UV'ing and texturing them so I can get them into engine and see my game looking right. I also noticed I lost some tail movement based on direction so I have to hunt that down. Anyway things are moving forward. I can't wait to show a nice big update with video.
Small Update
A lots happened since my last game play video. Finally found how to offset the Characters collision box on the mobilePlaceablePawn, he was floating 20 units off the ground before. It was simply in Pawn > Mesh > Skeletal Mesh Component > Primitive Component >Translation! Got touch doors working. Got "use triggers" working in first person default view with a use button on iOS but not working in 3rd person I'm guessing since 3rd person is currently not the player but a mobilePlaceablePawn. I've tried almost everything I can on the trigger kismet side, I think now I need to make the pawn the player. Doing tests today.
So trying to solve that.
Got a level that does have any textures in game, got gun working with generic fx. Still needs lots of tweaking. I want to get the use triggers working and get some textures and re-UV the objects so I can have a decent looking level to run around in and make another example vid. So more to come. I'm working on it.
Edit: Talking to a friend I think the problem is I need to possess the pawn Kismet > Action > Actor > Pawn > Possess Pawn. Target = Player, Pawn Target = MobilePlaceablePawn
Double Edit: Got "use triggers" working in a test map at work. You have to Posses Pawn and not toggle off the actor controls, then make the rotation connect to the actor instead of the pawn.
UDK Remote WORKING!!!
I screamed (in my head) when I got it working. Un-be-lievable! Wow. Just wow. freaking port forwarding on a mac router on my wifes computer, while I'm on windows 7, and not sure what what where and more abbreviations than anything else in computing... its finally working. I've spend I'd guess, 8 hours or so here and there over a few weeks trying to get that damn thing working. Argh!
Now moving on to game dev!!!
Now moving on to game dev!!!
Going to IndieCade
Just got a ticket to IndieCade. First time going, planning on checking out some panels and workshops. Learn a thing or two, and meet some other devs feel out how they're doing it and how its going. Hear their experience, and try out some of their games. Should be fun. I'm planning the schedule of things to see now.
Test Level Started
I'm getting things together for a test map to test out the character movement, game play mechanics like doors, switches 'n such. Its crazy how much I assumed would just click into place and didn't. Like how much I had to break the geo apart to get the right collision shapes. This image may look nice in editor, but in iOS it doesn't have any textures. That will probably take re-UV'ing since I did a quick auto UV and the scales will be way off if I try to use any sort of texture, so there's a lot of work to get even this test level working. Everything was built in Maya imported as static meshes. Gravity is kinda broken since it doesn't take effect while the player is moving. So before even doors, I need to get a lot more of the basics working right. Also still after hours of trying can't get the UDK remote to work! ARGH!!!! Thats annoying the crap out of me.

Getting back into it
Tonight got the buttons re-worked into a better more understandable state. Kismet needs to be cleaned up still, its a mess right now. I'm now not using the default joy sticks and added a button that has no function yet. Its going to be the use/action button once I can find out where the action command is in kismet. And the new joy sticks/buttons will work on both the small and large iOS screens. Positions and custom button shapes will be finessed later.


Aaaaand We're Back!
Finally finished with that side project and redirecting forcus back to the game! I started with a purchase of the new Eat3d, Unreal Development Kit 3 - iOS Mobile Game Production. Review on it to come. It is from Sjoerd “Hourences” De Jong so how bad can it be? His other DVD was pretty great, the level design on. Anyway. Back on!
Character Rigging Maya to Unreal
Never do too many steps in Maya Character rigging before importing and testing it in Unreal. Just when you think you know the pipeline for getting clean characters into unreal... it explodes again. WHY GOD WHY!??!? LOL, actually that's laugh cry, figuratively but it feels literal.
Little Pollock First in Game
Little Pollock first in game from destruct007 on Vimeo.
Audio is quiet, sorry. Its set up started as Jazz tutorial but the anim tree isn't the same at all, its more like the anim tutorials on the UDK forums I did set the gun up as a skeletal mesh and snap to the hand socket of the main char, so he can switch weapons eventually.
Anyway just getting a character in level.
3dmotive: Modular Building Workflow
Based on a recommendation I just got this http://www.3dmotive.com/product-modular-building-udk
Its a decent tutorial and at $15 I think it's worth it/priced right. Its short, and a lot of the ideas I already knew, so that made me bored. But there were a few key tricks and ideas in there that made it worth watching and buying.
I give it 3.25 stars out of 5. I like how quick it was but I think they could have pushed themselves to show more interesting and elaborate modular design.
Line Up
They are all now UV'd and textured with 1 shader (each that could be optimized further). I've been playing around with colors. Not "there" yet but ballpark. I'll probably go with this for now, rig and animate them, and get them into engine. I've been going over more anim tree tutorials (the 9 video tuts on the forums) Learning how to get their heads to work with look direction and get their body and tails to bounce walk/run.


Edit: just added this, thinking he should be darker, as he is a secret agent.

UDK WIP Forum Started
Started mirroring this WIP on the UDK forums so I can get more feedback, tips, pointers, etc.
Little Pollock, Crazy Idea?
Re-reading a post over at http://www.hourences.com/future-games-udk-projects/ got me thinking again. Am I asking too much of my first game? Wasn't my goal finishing a game that looked good? swapping out characters is very doable... So here's my idea. What if I make a simpler iOS game that fun and tests out making a game from scratch start to finish? Just like the students did only I can't work on it full time. I'm calling it Little Pollock. He's not textured just lamberts assigned to faces right now. Little Pollock is UV'ed, but the wolfs are not. He's low rez (obviously) so he should be able to work on older iOS devices also, or I'll keep that in mind and try.

Little Pollock
His head will turn with look direction tail will bounce as he moved and rotate as he turns, hands will bounce and react to shooting.

Little Wolf Guard

Little Wolf Soldier
Enemies are not as simple. There's a lot to figure out here. How does AI work? What works on iOS? How does their health system work? Lots of questions, and research topics.
Mobile Vertice issue
Not sure whats going on here, making a post in a second about it on the forums


if you look at that big you can see whats happening in game vs what I see in engine/UDK
iOS Developer
Just bought the iOS developer program. Next is to get UDK developer.
Working in game now, altho there is only 1 animation cycle and bad controls. When I get it to a decent point I'll make a movie of him running around nowhere.

Working in game now, altho there is only 1 animation cycle and bad controls. When I get it to a decent point I'll make a movie of him running around nowhere.

I should also add that there are some verts on the character that are offset when I play on iOS device, but not when I look at it in the animSet editor. So still some trouble shooting type things on the list
New UDK Hotkey Pref
A lot fo the old hotkeys go away in the june build of UDK unless you set
Prefs>Flight Controls>Use WASD Only when Right Mouce Button

Prefs>Flight Controls>Use WASD Only when Right Mouce Button

The reason I say this is especially if you are following a tutorial you'll get frustrated when a step involves a hotkey and you can't find the menu for that step either.
Character Animation Import Steps
It may seem easy to import a character with animation but there's bugs potential with that, odd binding, joints shifted, etc.
The best way I've found to do it is:
Character Anim Import
1) Import Original un-animated Rig, cleaned up as you would clean a rig w/anim after baking
2) Create animSet
3) Double click on that to open AnimSet Editor
4) Set Skeletal Mesh to Cleaned Rig
5) File>Import FBX Animation
6) select the rigged character with animation fbx
If you don't have blendShapes you can delete all the models on the rig in the animation file and just export the baked down bind rig. So you have a character rigged, reference that into your animation scene. Animate it, save it. Run your bake script (select -hi of bind rig, bake all, delete everything that's not a joint in the bind rig or an animCurve) export that as fbx. That's what you import into the animSet, and you can import them all at once if they are in the same folder, like fbx/charName/anim/ select all an import through the animSet editor.
*Video Tutorial on this to come*
Freelance and Vacation
Just an update, I finished fx for a commercial then went on vacation for a week. So I'm back on the case!
Skin Clusters and exporting
Something I'm working on, whats the optimal way to rig if the number of skin clusters is a consideration? Skin Clusters take up time on export and I imagine on import altho its hard to say for sure since Unreal Doesn't say as much as it imports as Maya does while exporting.

The skinCluster binds only a single geometry at a time. Thus, to bind multiple geometries, multiple skinCluster commands must be issued. - maya Docs
So other than normal clean rigging practices, keeping object count low will help. So I guess the question is, when and how much do you merge objects together? b/c one might separate objects for shading group reasons. (more on that later)
Quick Tip #Obj to #Shaders
In Unreal engine as far as speed and optimization goes:
1000 objects with 1 shader is equal to 1 object w/ 1000 shaders
you have to cut down on one and/or the other to reduce draw counts.
1000 objects with 1 shader is equal to 1 object w/ 1000 shaders
you have to cut down on one and/or the other to reduce draw counts.
Simple Optimization Testing
Play From Here in Viewport,
Then turn on the following stats ( ` button to bring up the command prompt):
stat fps (this will bring up the MS per frame)
stat unit (frame times for different parts of the engine)
stat d3d11rhi (this will give more interesting rendering info)
Take a screenshot of all to get an idea of the cost.
(Not that I'm already at this point in my demo game but I'm being taught this at work)
Animation Naming Convention
(char)_(action)_(direction)_(descriptor/weapon)
example:
Pollock_run_fwd_pstl = Pollock running forward with a pistol
Pollock_idle_na_rfl = Pollock standing at idle no direction with a rifle
The weapon slot should be considered an extra description
cloud_float_fwd_lite
It doesn't have to be a weapon, its whatever the anim is contingent on for that character/object. If all the runs are with this gun, then it has to be part of the name. If all these actions are after character is hurt... that's the descriptor.
Maya to Unreal Scripted
Wrote a tool (that's still name dependent somewhat) that strips the rig clean out and baked anim on the bind rig, etc. Nice and tiddy. All things appear smooth. I have no excuse now not to have a character running around in game by Friday. I had an FBX issue that held me up over the weekend, that was fixed with an update on Monday.


in case you've been wondering
I've been on my UDK blog more than here. http://agentfxudk.blogspot.com/ I'll still come back here in a bit I've got some ideas and new tutorials to do, so sooner or later there will be a bunch of updates.
Success Rig & Anim import working!

I baked the bind rig, and deleted all constraints in the bind rig. Deleted the anim rig, then went through the DAG nodes and deleted everything expect the skin clusters and anim curves. (In future tests we'll figure out what specifically needed to be cleaned out) but as it stands now I even deleted bind poses (despite the warnings on FBX export).
couple of things, when modeling in maya if you duplicate and mirror, meaning <<1, 1, 1>> mirrored to <<-1, 1, 1>>> it will reverse the normals on import. So either reverse the normals in maya on those pieces or freeze the scale transforms on the objects (maybe built into the rigging system)
Also was getting some jacked up binds in Unreal with geo being offset from some joints (the left arm in my case). So I reset all joint rotations to <<<0, 0, 0>> at frame 1 (not keyed, just set manually) and exported all. That worked.
Export selection never seemed to work, hence me having to really clear everything out.
Pollock Run Cycle
Pollock Run Cycle Unarmed from destruct007 on Vimeo.
First pass at a run cycle. New rig, and first test animation. I referenced the rig into this scene, and quickly did this animation. I couldn't get it to bake down either in FBX export process or in "Bake Simulation". I'm going to talk to a TD friend of mind at work and see what can be done to get this character to import into Unreal.
Pollock Rig Walk Through
Pollock Rig Walk Through from destruct007 on Vimeo.
Just a video walk though of the rig from the character pipeline we're working on. This rig in this state doesn't import into Unreal, so thats the next step. Scripting a bake/export process.
Josh spent 2 hours setting this up in the character pipeline, and I spent 2 hours painting weights. 4 hours from Character Model to Animation with this level of control (no facial rig).
Have a look at this awesome rig!
Re-modeled for rigging pipeline
First thing we needed to do to pipeline the character process is rename the objects.
(side)_(part)_rez
ie. c_body_mid, l_wristguard_mid
Then came the first set of changes needed for the pipeline to work with the actual model. After fixing this and getting the rig back I can see some objects will need to be merged, and more resolution in the shoulder/arm connections. But those changes can wait until after its working in unreal and more game play has been developed.
UV Mapping in Maya Tutorial
Its crazy how easy it is to UV map in Maya. I never knew this tool was added, the "Unwrap" tool. I've been UV'ing the old scholl way and its slow and painful. This is crazy fast and easy.
Thanks to Sergio Santos for pointing me in the right direction.
UV Mapping in Maya from destruct007 on Vimeo.
Thanks to Sergio Santos for pointing me in the right direction.
UV Mapping in Maya from destruct007 on Vimeo.
Panner Node Tutorial
Short explanation of the panner node in UDK, but breaking it down into just math nodes. I think it helps to understand what texture coordinates are, and how they work to see the panner node as just math.
UDK Panner Node Breakdown from destruct007 on Vimeo.
UDK Panner Node Breakdown from destruct007 on Vimeo.
Rigging + MoCap
So I'm building the rig and its funny to remember so many parts of rigging that I forgot. I feel so rusty. I haven't rigged a character in years. I don't want to do human IK b/c its more a pain than its worth. I'll do simple IK/FK switching as in the one built into the IK system in maya. Everything is going to back down to the end joints anyway so no point in over building, at least not until I start seeing I need more. There aren't that many moves I need right off the bat. He doesn't jump. Its crouch, run, walk, shoot(x3 for the 3 guns), back to wall, idle, open door? Not trying to make a AAA title just get the key moves out for game testing.
Anyway as I rig I'm for to remodel certain areas like elbows knees, and I added a few things that have been bothering me, like figured a shoulder pad that works for him. Also its going to look quite different when textured, I'm planning on learning zbrush in about 2 months when I push the art harder, but for now I did a temp quick pass at texturing Pollocks face to give an idea of the look he will have. This will all be redone, just a color pass.

Anyway as I rig I'm for to remodel certain areas like elbows knees, and I added a few things that have been bothering me, like figured a shoulder pad that works for him. Also its going to look quite different when textured, I'm planning on learning zbrush in about 2 months when I push the art harder, but for now I did a temp quick pass at texturing Pollocks face to give an idea of the look he will have. This will all be redone, just a color pass.

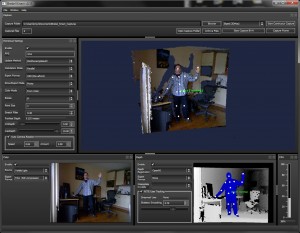
Brekel/NITE/Kinect Mocap
First off let me say thanks to Brekel for the free awesome tool.
Its working, not a miracle capture yet. Meaning the process needs some TLC to get it nice and smooth workflow wise. Right now I see that the imported skeleton can have different joint lengths, so that needs to be edited to match the character.
First we need a motion capture clean up utility.
Probably snap the transforms of each joint to the character and have the rotations constrained to the mocap rig. Then make some sort of over that rig to adjust the animations and add some gross movements in obvious places, hands, feet, head.
Did some tests, basically the skinned rig can be exported in fbx and baked out animation, seems to work pretty well so no worries about complexity of the other rigs... at least for now it seems.
I think this tool will be great to get working temp animations into engine. The goal will be rough working animations to plug into the animtree and get the game working. Once its working pretty well we can go back and make the anim either better motion capture or just hand anim fix all the clips.
Kinect MoCap Update
I wanted to do an initain anim pass with just motion capture for all the needed poses and anims quick and dirty, tweak them later or get better motion capture to replace them. This idea slowed me down a lot until yesterday.
Slowed me down b/c I was trying to think of what kinda of rig I wanted, what was going to be best in engine etc. Well my friend Will knew the solution right away, well almost but the last pieces of the puzzle were a few clicks away. Here's the short of it
This tool captures:
I got it working at work and instead of 3rd person camera I'm going to get this setup working at home and start getting a skinned rig connected to the mocap rig in a smart way that works in engine by the end of the weekend.
Slowed me down b/c I was trying to think of what kinda of rig I wanted, what was going to be best in engine etc. Well my friend Will knew the solution right away, well almost but the last pieces of the puzzle were a few clicks away. Here's the short of it
This tool captures:
and this free plug-in brings it into Maya
http://www.creativecrash.com/I got it working at work and instead of 3rd person camera I'm going to get this setup working at home and start getting a skinned rig connected to the mocap rig in a smart way that works in engine by the end of the weekend.
UDK Collision Channels Tutorial
Like I mentioned I figured out collisions in UDK as they were really confusing to learn. When I did understand them all came together in an obvious and logical way. I realized it wasn't hard, it's easy... once you understand the logic.
So here's a quick explanation and example of kActor collisions and I threw in cloth for good measure.
UDK Collision Channels Tutorial from destruct007 on Vimeo.
Text based explanation:
So here's a quick explanation and example of kActor collisions and I threw in cloth for good measure.
UDK Collision Channels Tutorial from destruct007 on Vimeo.
Text based explanation:
RBChannel = the channel or layer that that RBD is on
Block Rigid Body has to be on
RBCollide With Channel = the channels or layer that the RBD can collide with.
So lets say I want a wall that only my ninja can go through. I put the wall to
RBChannel = Untitled 1
don't worry about what collide with channels the wall has, b/c it won't collide with anything since its not moving, things will only collide with it.
Enemy soldier
RBCollide With Channel = Untitled 1 check box (in addition to other things like default etc)
Ninja has the same setup as Soldier but no Untitled 1 check box and the wall won't exist for him.
Same thing works for cloth but cloth's RBChannel is defaulted to "cloth" logically and you can change that but cloth will collide with everything on its layer.
ToDo list
The real reason for this post is to start thinking out my to-do list, what to do next. The rigging process is slow and I don't want to just keep rigging right now. So I might switch gears to 3rd person Camera setups.
Goal: End of this weekend get an Unreal script based 3rd Person Camera setup working. I have some ideas for it that might be neat. Well neat for a nerd I guess LOL.
Goal: End of this weekend get an Unreal script based 3rd Person Camera setup working. I have some ideas for it that might be neat. Well neat for a nerd I guess LOL.
Pollock Updated UV Mapped
UV mapping is something some people might assume was done with the modeling... it wasn't I recently learned the modern way to UV map in Maya with the "unfold/relax" tool. Spent 3 hours between Thursday night and Friday morning UV'ing the old way. Daaamn, this process is so eye opening. So many of my areas of knowledge are outdated. Even tho I'm spending lots of hours w/o out big updates, I'm learning a ton in the exciting fun way where its like WOW this is awesome! Love this and that! hah. I've rigged and tested putting the character in engine, but really I need to figure out what the FBX workflow is for importing animations. The rig was temp and more just testing.
Big update on fur with the shell method and using some DirectX 11 stuff, well, just the better AA feature. I'll do a video tutorial on fur since it's pretty fun to see all that you can do with it in the material editor. But for now, here's Pollock UV's and updated, pretty much final low rez.


Big update on fur with the shell method and using some DirectX 11 stuff, well, just the better AA feature. I'll do a video tutorial on fur since it's pretty fun to see all that you can do with it in the material editor. But for now, here's Pollock UV's and updated, pretty much final low rez.


Pollock tweaked
Even tho I'm posting all this its really just catching up to where I am now so I can use this blog to keep my peeps up to date, anyway as I looked at "Pollock" the main characters working title name. I saw that I tweaked it more since that picture so here's a quick update of the tweaks.


and the enemies
there are only going to be 2 types, a guard and a soldier. Both the same but one is more like the SWAT team coming to kick some ace! All only modeled today and last night actually. Just getting some rough assets made. Not looking to make the most original idea evar, just making my first game. The goal was to no make a game with too much new game play, and try to use UDK for what its best/easiest at. I'm learning unreal script but there's so much work to do I don't want to make more work for myself in that area. So a 3rd person camera game is one of the first things, the cameras and an alarm system are what I'll have to script/program. The game is kinda like... a lot like metal gear/splinter cell. But crappier and much shorter, LOL. hey its just me!


On to the Game
So this is a game developer blog of sorts, well really all things UDK that interest me not solely my game I'm developing. So I got to the point of learning rigging from scratch in UDK and realized I needed a model. First asset. Yay! Fun thing is at work I'm learning Fur techniques and Cloth, so that can come later.
Here's the low rez out of Maya characters. I want to learn zBrush and take these in there and uprez them then into topogun or something and get multiple levels of resolution out with normal maps. Thats yet to come, first lets just get these into UDK running around, right?


Here's the low rez out of Maya characters. I want to learn zBrush and take these in there and uprez them then into topogun or something and get multiple levels of resolution out with normal maps. Thats yet to come, first lets just get these into UDK running around, right?


UDK FX Tests
More getting up to speed these are the UDK FX tests I did.
http://vimeo.com/15014234
http://vimeo.com/15862026
http://vimeo.com/18816281
http://vimeo.com/19355289
and a dynamic level loading/unloading test
http://vimeo.com/22177603
not that you have to watch these just to say this is where I've been, some things to see...
http://vimeo.com/15014234
http://vimeo.com/15862026
http://vimeo.com/18816281
http://vimeo.com/19355289
and a dynamic level loading/unloading test
http://vimeo.com/22177603
not that you have to watch these just to say this is where I've been, some things to see...
Learning UDK
Last October I decided I'm going to go all in and learn UDK. My background is FX in film as seen in part on my other blog agentfx.com along with some video tutorials on various FX topics. First I wanted to get good at FX in Unreal so I could get a job working with it full time (which I have now). So I got well versed in Cascade, Lighting, Materials, Kismet, Matinee, etc sort of the back end of things (vs the front making models, rigging character animating creating assets in maya which I already know how to do).
My Process
I scoured the web looking for all the quality video tutorials I could find then bought ever DVD made (or choose the best option for duplicate topics based on instructor exp). As I learned I got to the point were I felt I need to make a game to really test my skills in every area. Initially I wanted to make it with a team but ultimately choose to start out on my own until I get the game to a point in which people can add a few bits of polish and level design type things. To get my friends up to speed and track what I have and haven't seen tutorial wise I made a google doc where I tried to make a fast track to learning UDK, from what's the best on the web to what DVD's are well worth the money. I'll keep updating it, so post links and I'll check them to see if they are worth adding to the list. The point isn't to have all the tutorials but the fewest possible to learn the tools. Its a little rough looking in the "publish to web" formatting but whatevs its the best method for keeping up on it.
Review: Eat3D's UnrealScript
As with all recommendations a lot depends on what you want to do and what you already know. My programming experience roughly is advanced MEL, some Python, Java, JavaScript, and familiar with C/C++ syntax. I've already gone through a lot of Allars Awesome Blog, all of wildicv's and The Guild Hall's youtube tutorials. Still, I wanted to get Eat3D's UnrealScript - An Introduction and Application to help fill in gaps and felt it was worth a check out being from Eat3D.
If you're like me, with some programming background, then I'd say its still worth it despite being an introduction. Just realize you're mostly paying for the second half. I'm really happy with the skill level and quality of instruction. I still recommend it, b/c he has production knowledge and good examples. Its nice to have them b/c I'm sure I'll re-reference the second half again and again.
I give this DVD a 3.75 stars out of 5 (4.25 if you have less experience). Great, full of useful information, He doesn't explain a few delete & adds in the weapon example, but does a great job explaining most other things. I'd highly recommend this in combination with the other two tutorial links above. Each one has its strengths and together fill in each others gaps to make a nice big picture.
Fluid simulations are hard
I would think this post might be sarcastic like CG is hard :'( but no. This post is to explain why fundamentally fluid simulations are hard to control.
Real World Example: I give you a bucket of water and a variable speed fan. For a 3 second shot I need you to get the water swirling at just the right speed, not too fast not too slow. You have 1 second of "run up" time. Go. You take the fan, turn it to a setting try it the water splashes all over you and the floor. Nope too fast. Slower, water splashes all over you again. You feel like an idiot. Slower, The water splashes all over you again. Now you're mad, REAAADLLLY SLOW!!! the water doesn't move. ok little faster, water doesn't move. Ok little faster, water moves right for 1 of the 3 seconds. turn it on and off. 2 of the 3 seconds.... Ok that was a 40x40x40 now you get the titanic sized engine, and a small lake. Turn on the engines! 3 seconds! This should be easier b/c remember all your experience from the bucket? Huh, that's not really helping now is it? no. Not really. In fact its so different the titanic sized engine isn't really the best thing for this. Maybe you should find another way, 1000 motorboat engines! Its expensive but its fast to turn on and off! 2 weeks of trying and it doesn't move much water even tho there are so many. Well that was an expensive test. how much does it cost to bring the titanic engine back in here?
Here's the kicker. That's just 1 setting, magnitude. there are hundreds of settings. Think you are tweaking the right one?
Morpheus, "and that's air you're breathing? huh... AGAIN."
Review: Gnomon Unreal Development Kit: Materials
Unreal Development Kit: Materials; An Introduction with Waylon Brinck is great. Just finished this DVD and wow, what a ton of information. I didn't think I really needed this DVD initially since I knew well how to work in the HyperShade in Maya and the Material editor in UDK is similar.
I'm really happy with how much I learned and how many gray areas were cleared up. I love how he broke down the math in a clear way. Some points I was like ARGH of course! now that makes sense! For example how the math behind how "levels" works in Photoshop. Not as complicated as I thought, totally get it.
This DVD is great for beginner-ish to advanced artist comfortable in another 3D app who want to get a solid base for materials in UDK.
This DVD well worth it. Only negative is the lessons are a little dry. I could only watch a few chapters a day, even tho I wanted to watch more.
4.5 stars could only be better with some jokes spattered in there. Top quality instruction, lots of practical, useful examples. Very happy with this purchase. Recommend.
Review: Gnomon Visual FX for Games
I'm a big believer in continuing education. As I continue to push from film FX into the game world, I buy anything I can get my hands on if it looks good. I took a risk on this one, The Gnomon Workshop: Visual FX for Games, I wasn't sure. It started off really bad, and I was afraid I wasted my money, but it quickly got really good.
I think the description is a little misleading, they push the software aspect of the DVD, like saying "Fume FX" where there is only a reference that "this was made in Fume FX". Very little how to do things explicitly. Its not even that engine centric, so this would definitely work for other engines as well.
Maxime walks you through a wide range of FX, breaking down how they're made and what to consider when creating them. He's got a lot of tips and tricks, and general good to know stuff. As a seasoned film FX artist I wondered how eye opening that would be. Some key areas I was like damn, I don't know if I would have thought of that!
Overall I give it 3.5 out of 5 stars, not for everyone, but highly recommend and well worth the money for FX artist. Best for people who have a decent grasp of a game engine like UDK, and a 3D package.
Edit: I think I might give it 4.5 out of 5 since this is the only DVD I've gotten (ok Lighting too) that I've watched again. Its pretty good. Lots of little tips that with a re-watching you catch. Its a great resource as long as you know what to expect. Its a breakdown of game FX not so much how to make them from scratch.
Schools + DVD break-down
Thought I'd do a break-down of some of the schools and DVD's out there. This list is not comprehensive, more like, off the cuff what I think of the ones that pop into my head.
As far as DVD's
eat3d has the best UDK (I haven't tried their other stuff) but you can tell they put a lot of time an energy into the examples. I feel they make a high quality product.
Gnomon has the best in depth (maya and other 3d 2d stuff)
Gnomon also has the subscription service which is one of the best values in online education.
Digital Tutors always get the newest stuff out way before anyone else. Not as full in the FX categories but lots of topics and good introductions to many things.
and 3dbuzz is awesome all around. Really like those guys, and for the most part its free!
Schools:
Gnomon School, produces the best modelers because Alex teaches the best classes and pushes REALLY hard so everyone comes out a really good modeler, altho you can come out a lighter, rigger, animator too... And if you're lucky I teacher there from time to time doing FX Classes.
Full Sail, Ex'pression Center, and other crank 'em out high cost schools are not bad, but you have to work hard to take full advantage of your education. Thats another blog post, I'd recommend them to the right person, ideally someone with some collage experience.
Animation Mentor is the best animation school, pixar guys... and I know people who've gone and speak very highly of it.
fxphd is one of the best TD schools. I've seen some of their course material/tutorials and great classes really informative.
there's also Animation World Networks (awn) database of schools
If you happen to be in France, then you'd be lucky to go to Gobelins which has produced some of the best student work in the world, IMO. I donno what they're doing but they're doing it right.
Anyway let me know what I'm forgetting, this is just a quick brain dump.
Free Gnomon Fluid FX DVD's*
Free if you live in LA and want to pick them up at DD, ro arrange to make it ubber easy for me to ship them to you. I have 2 sets of 3 DVD's Fundamentals, Particle Integration, and Pyrotechnics (that I made years ago but still hold up for the most part) I also have a RigidBody Simulations for Visual Effects from the Kolektiv from 2002, that also has some neat tricks and worth a watch, hah considering those RBD's are still there in maya! Email me if you want them. Thats sort of a trick, whats my email? Not too hard to figure out, or you can find it for sure. Find it, guess it, email me and ask for them, (or linkedin message me) I'll update this post when they're gone.
Update: Gone.
Update: Gone.
CG Jobs are Hard :`(
This article is part of a growing sentiment in the vocal disgruntled CG artists, whom I want to give a general “fuck off” to. Pardon my French. http://goo.gl/BSWvJ and http://goo.gl/ralvJ
A lot of people come into this industry, with false/unrealistic expectations. They think they are going to be making explosions and animating lead characters, and having fun, yaaay! People are going to know their names and see them in the credits! Then it turns out to be hard work and competitive. Guys work hard but not enough work smart. They work tons of hours and a lot of people don’t get compensated for it, or rather didn’t in the early days. Companies pushed them for more and they just fold like a deck of cards then get mad that they got taken advantage of. They lash out by saying how hard this industry is and how many shit jobs there are. There are no shit jobs, just shit attitudes. I loved roto, and did it better than 99% of roto guys, why? b/c I studied the frames and found key frames in action to make the least number of keys in my rotos. Matchmover, I enjoyed that too, b/c I tried to get good, matchmove what others cannot, make clean plates that are next to impossible, use my artistic skill and push myself to be even better, faster. 3d Model clean up, I figured out how to write MEL that would automate what I could, tried to make tricks to clean up geo faster, researched other applications that can re-topo... its all what you make of it. Render rangler is one of the best jobs, you learn one of the most important things, how to trouble shoot render issues. Everything needs to be rendered, and you then become an expert at it, very valuable easy to move into other positions.
Long hours? sure. We had deadlines. I work my best at everything I was asked to do. When asked to do OT w/o pay I said I’m not available to work w/o OT pay. They said but we really need to get this done! I said yeah we do...(pause) they say, “ok fine!” then I’m like, “great lets do it!” Thats an example of push-pushback that everyone in every job needs to have. Don’t get pushed around, or when you see how you are being pushed around push back or quit. If you work hard and smart constantly trying, then you have real job security. Places you worked before will want you back, b/c you bring real value to the company. They make money off your talent = real job security.
I did and still do, go home at night and continue to test and push my FX and other CG knowledge further. Its never enough, there is no end, this is not a marathon! Its running from the “nothing” (never-ending story reference). All these people who bitch about how hard it is can go cry me a river. Work your ass off, and that’s not enough, but FUCK, you’re getting paid $100,000+/- fucking be worth it!!! Don’t cry, make your life better, work smarter, think and rethink how and what you are doing with your time. Or alternatively, leave this industry b/c its not for you (btw “games” is not another industry it’s just another format).
There are too many people already who don’t know what the hell their doing. It doesn’t take long to figure out who’s good and who’s a button pusher. Know how? It’s not 2 kinds of people, talent and button pushers, its people who never stop trying and people who do*
} //End Rant
* with the exception of super talented people who never need to try, I’m looking at you Ben Neall
Pulled the Trigger on Sandy Bridge
Upgrade time. Well time b/c my computer died, and the RMA process on a mother board is long and painful. Basically started buying new parts (geforce gtx465) to test if it was in fact the mobo that died, until I was like screw it. The Sandy Bridge, Core i7 2600k went on sale today. The K being the unlocked multiplier, but even still looks like a 20-25% gain on the core i7 920 I had/have. Not as exciting as if I'd waited until 3Q of this year but whatevs, need the new parts so got it.
If only it were that easy, get a new mobo and chip! Argh, I have 12 gigs of triple channel RAM, well guess what, triple channel isn't supported on the P67 platform, yaaaay. I guess the benefits were never shown for triple channel in real life tests.... aaanywho if you've even read this far I'm boring myself. So I got 16 gigs of DDR3 1600 dual channel RAM, and a 120gig SSD for the OS and apps. So all in all about 1.5 years later from my last computer build I spend another $1100 on my desktop. All on the hope that the power supply isn't the bad thing, oh god if it is I'll cry, then buy a new power supply.
I looked into a Dell but they are all, as expected, old PSU's and seem over priced. I do wish I had their support on my computer now but just can't bring myself to go that route. I'll probably go Mac... I keep saying that, if only for resale value, but never want to drop the actual initial money. Funny I hate spending a lot of money on that which I most.
Subscribe to:
Posts (Atom)
-
 Overburn technique video tutorial from destruct007 on Vimeo . From Peter Shipkov's Overburn technique (maybe not the first to do it b...
 -
Fire Part 1 from destruct007 on Vimeo . Here we start with the basics of fluid fire in maya. We just get the ball rolling, but it should b...
-
Fluid Emitter Turbulence from destruct007 on Vimeo . Maya Fluids quick tutorial on the fluid emitter's turbulence setting. How to g...